Subtitle Transcription Guide: Edit, Translate, Align, and Export Subtitles
Learn the full SnapVee subtitle transcription workflow: create subtitles from public links or local media, edit text, translate into multiple languages, align the timeline, and export usable subtitle files.
Subtitle transcription is not just speech-to-text. A subtitle file that can be used for editing, courses, interviews, podcasts, or multilingual publishing needs four things: accurate source text, usable timestamps, translated lines that stay aligned, and export formats that fit the next tool.
You can start from the SnapVee subtitle transcription tool. This guide explains the full workflow: creating a task, editing subtitles, translating them, aligning the timeline, and exporting files you can reuse.
1. What subtitle transcription can do
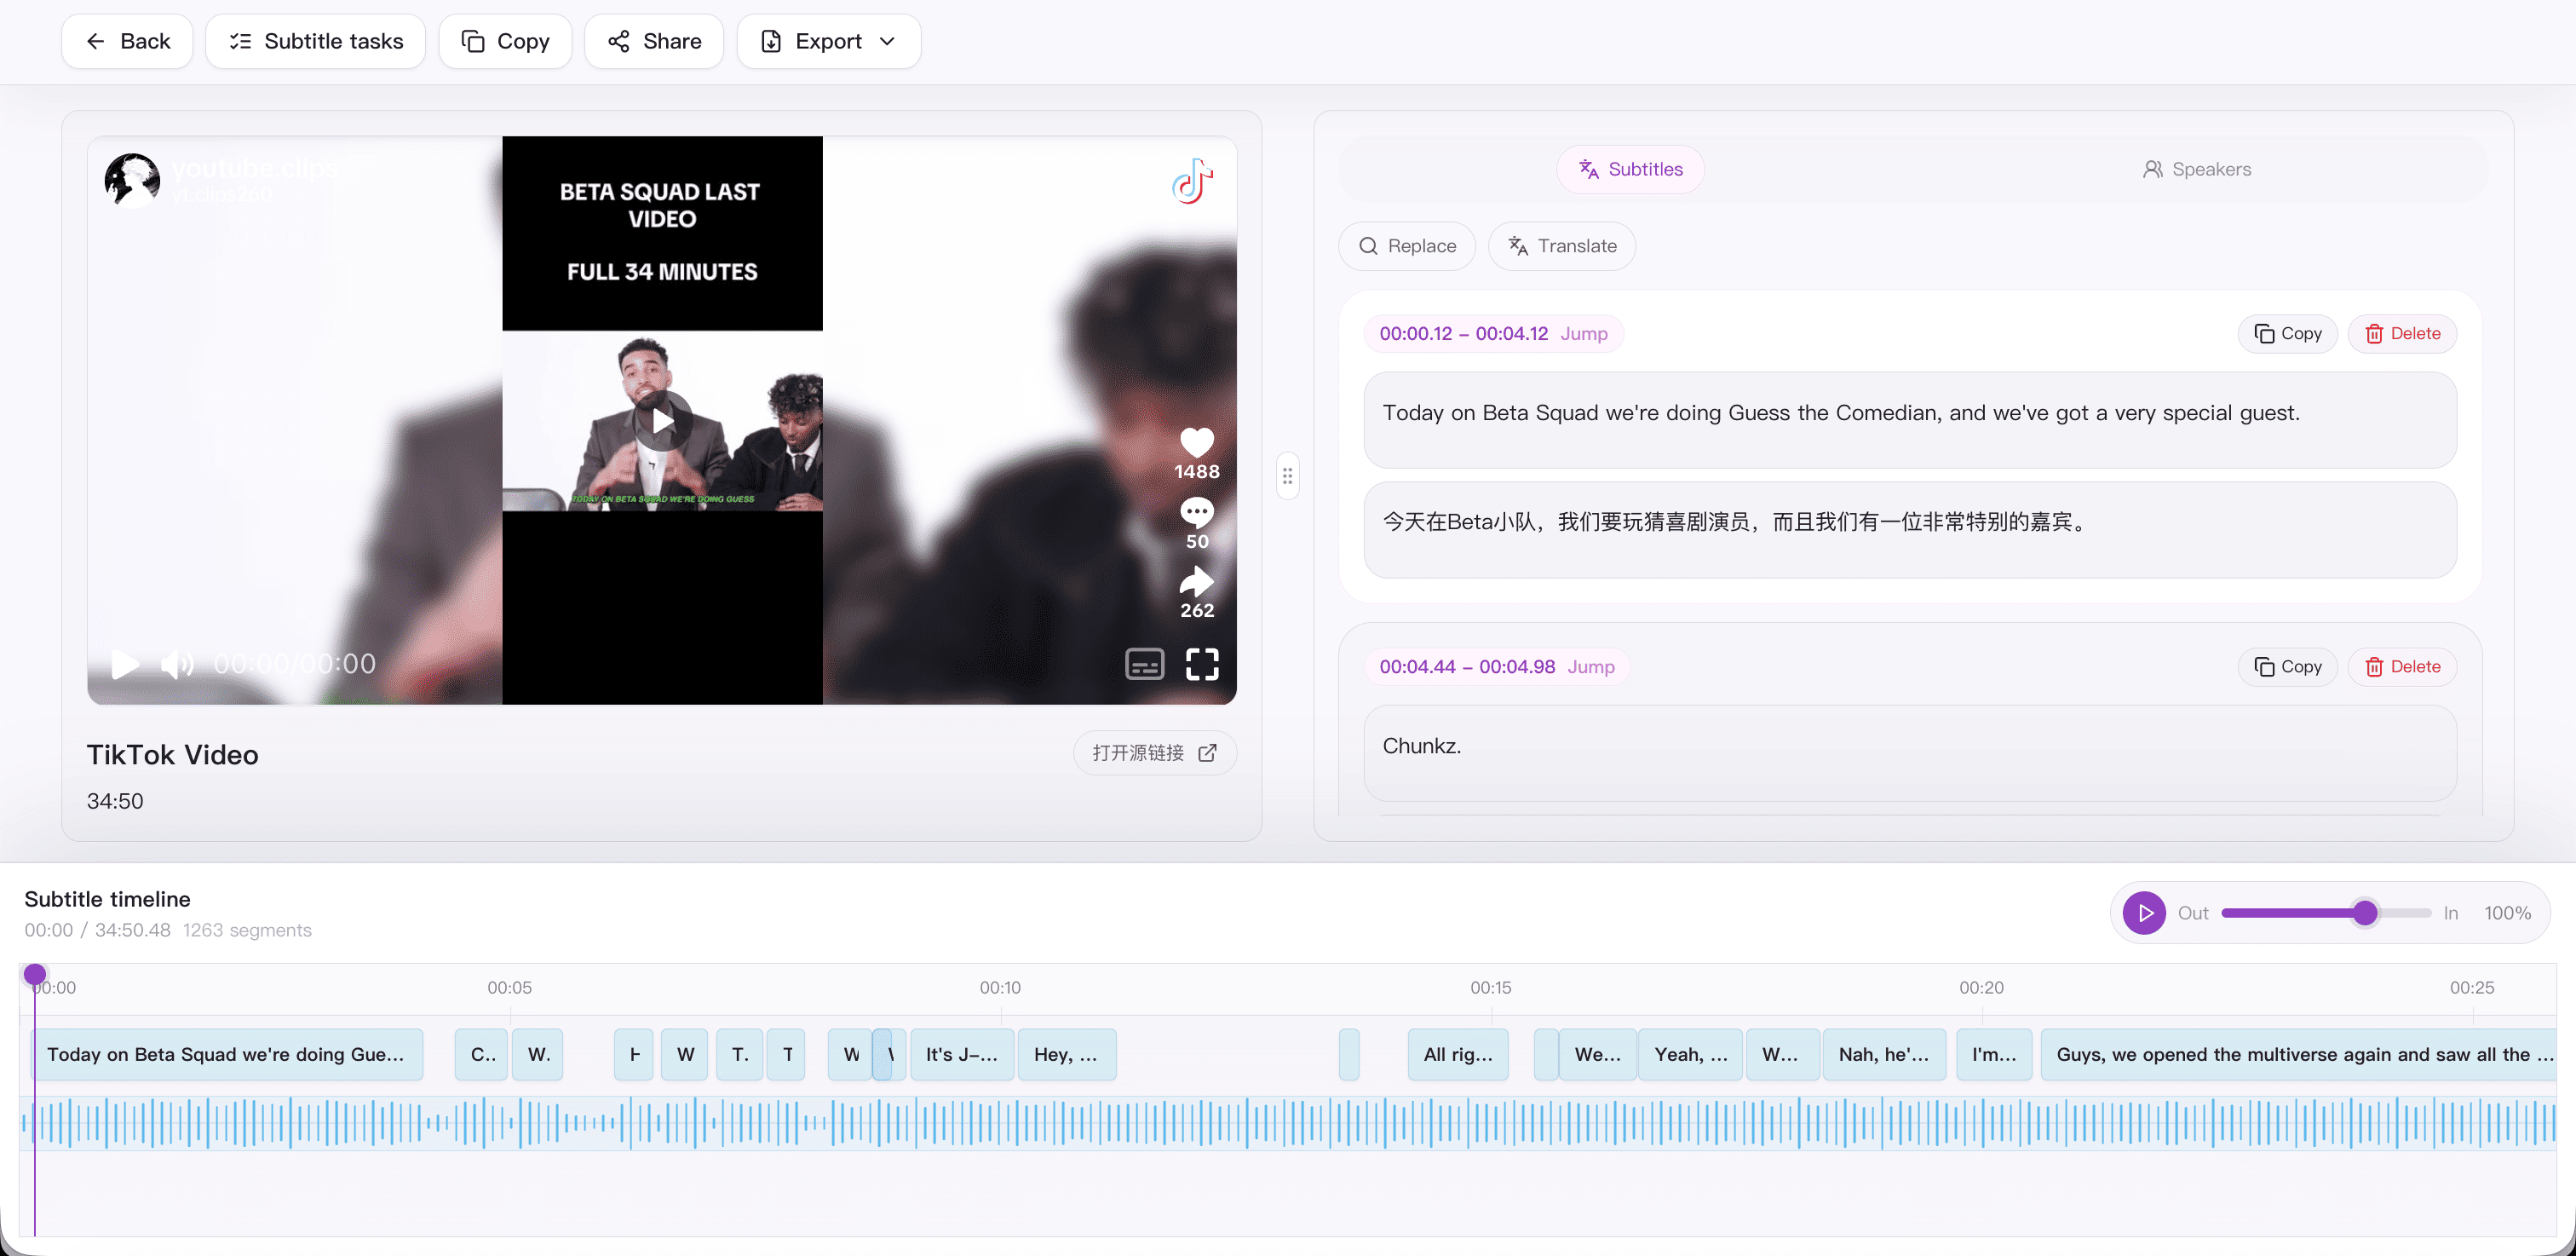
SnapVee subtitle transcription is designed for editable subtitle deliverables, not a single rough transcript. It helps you:
- Generate timestamped subtitles from course recordings, interviews, podcasts, webinars, and long videos.
- Create tasks from public media links or local audio and video uploads.
- Review source text, translated text, and bilingual subtitles on the same timeline.
- Edit subtitle text, speaker labels, timing, and export-ready script sections.
- Export SRT and Markdown files for video editors, note systems, and content reuse.
- Generate segment-level dubbing audio when a single subtitle line needs a voice version.
The main value is what happens after transcription. A plain text transcript still needs segmentation and timing. A timestamped subtitle script can go directly into review, translation, editing, or publishing.
2. How to create a subtitle transcription task
Open the subtitle transcription page. You can start in two ways:
- Paste a public video or audio link, such as YouTube, TikTok, BiliBili, public Xiaoyuzhou episodes, Apple Podcasts, or Ximalaya.
- Upload a local video or audio file, such as a course recording, meeting audio, interview file, or editing source.
When you create the task, choose the output language if you want translated subtitles. SnapVee first prepares the source: it prefers available platform captions when possible, then falls back to audio transcription when captions are not available. The task then moves through source intake, transcription, translation, script preparation, and completion. Long media keeps running in the background queue.
Before submitting, check three things:
- The link is public and does not require a private login.
- The local file has clear audio and limited background noise.
- If you need bilingual subtitles, choose the target language before review so the translation stays aligned from the beginning.
3. How to review and edit subtitles
After the task completes, the result page becomes the editing workspace. You can review the source transcript, translated subtitle text, bilingual view, export files, and the timeline.
Use this order for efficient editing:
- Play the first one or two minutes and judge the transcription quality.
- Fix obvious typos, names, brand terms, technical terms, and repeated filler words.
- Normalize speaker labels if the content has multiple speakers.
- Shorten subtitle lines that are too long to read comfortably.
- Save changes before exporting, so exported files use the latest text and timing.
Subtitle editing is not article editing. Subtitles should be clear, short, and easy to read while the video keeps moving.
4. How to translate subtitles
Subtitle translation is different from document translation. The translation must stay attached to the original timing, and long translated sentences may need compression.
SnapVee translates segment by segment while preserving the timeline. You can review source and translated text together, then adjust the lines that need better wording.
Recommended workflow:
- Correct the source transcript first, then translate or refresh translation.
- Check names, brands, product terms, and domain-specific vocabulary.
- If the translated line is too long, compress the idea instead of keeping every filler word.
- In bilingual mode, make sure the source and translated lines describe the same spoken segment.
For interviews, tutorials, and podcasts, the bilingual view is the fastest QA surface: source text, translated text, and timing stay visible together.
5. How to align the subtitle timeline
Timeline alignment decides whether subtitles can actually be used in a video editor or player. Common issues include subtitles appearing too early, staying too long, overlapping the next line, or splitting a sentence at the wrong moment.
In the timeline editor, you can move the playhead, seek to a subtitle line, drag a segment, and adjust its start or end boundary. Use these rules:
- Start a subtitle slightly before speech begins so viewers can read it in time.
- End it before the next line starts, leaving a clean transition.
- Do not split every tiny pause, but do split speaker changes and topic changes.
- Avoid obvious overlaps between subtitle segments.
- Fix large timeline offsets first, then tune individual line boundaries.
When the media player is available, listen while adjusting the segment. If the media cannot play, you can still review the subtitle timeline and fix obvious gaps or overlaps.
6. How to export and reuse subtitle files
After review, export the view that matches your next step:
| View | Best for |
|---|---|
| Source subtitles | Video editors, original-language publishing, course archives |
| Translated subtitles | International publishing and separate subtitle tracks |
| Bilingual subtitles | Learning material, interview review, cross-language QA |
| Markdown | Notes, blog drafts, team review, knowledge-base cleanup |
Always save changes before export. If the page asks you to export after saving, it means the current text or timing has changed but the export file has not been regenerated yet.
7. Common mistakes
- Reading only the transcript and forgetting to check timing.
- Translating before fixing source text, then editing the source afterward.
- Keeping long spoken sentences in one subtitle block.
- Letting names and brand terms vary across the file.
- Exporting before saving the latest changes.
Final takeaway
A usable subtitle workflow includes task creation, source review, translation, bilingual QA, timeline alignment, saving, and export. SnapVee keeps these steps in one result page so video, podcast, course, and interview content can become reusable subtitle assets.
Start from the SnapVee subtitle transcription tool, paste a public link or upload local media, and generate an editable subtitle script with translation, timeline editing, and export support.
Related guides:
About the author
Jason Jiang
Product and engineering lead
Maintains SnapVee's core product features, ships platform support and product updates, and writes official tutorials and comparison content.